Colibri FAI Logger
1. General data
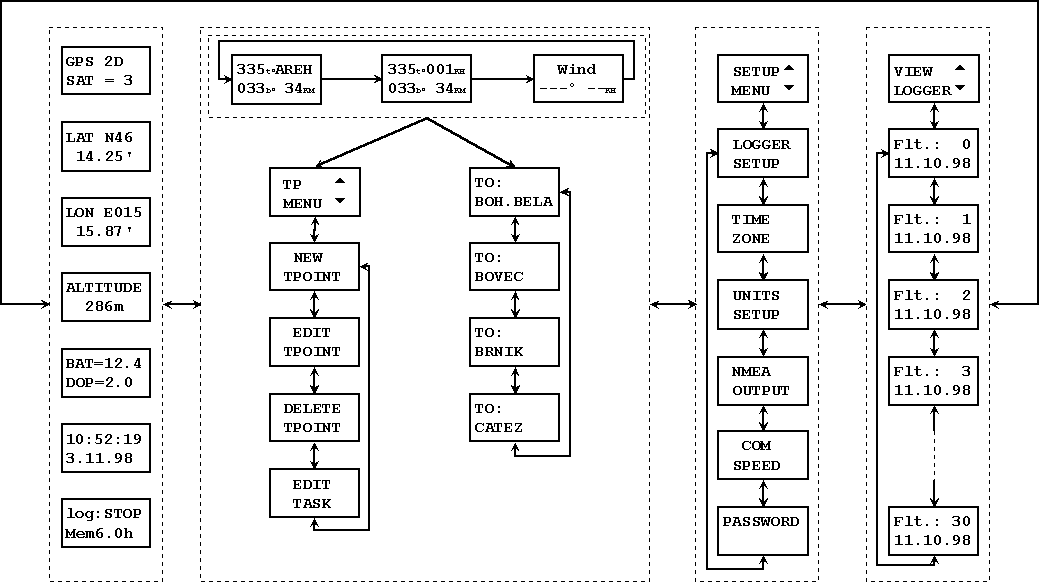
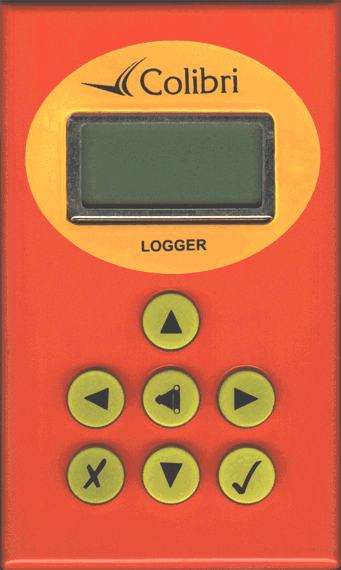
The Colibri FAI Logger is an approved flight logger. The unit is extremely small and practical (55x100x32mm). The unit is operated via seven keys identified by symbols. All the data is displayed on a 2x8 matrix display. A BNC connector is used to connect the GPS antenna to the unit. The instrument is turned on by connection to the telephone connector.
Technical data:
- Power Supply 10-24 V DC
- Current consumption ca. 100 mA / 12 V
- 11 channel GPS receiver
- NMEA output
- Dimensions 55x100x32mm
- Weight 220 g
- Engine sensor is standard equipment
- Zoom feature
After pressing the right arrow the Navigation menu follows which allows navigation with bearing, distance and ground speed. Turnpoints which are stored in the data base can be selected and also edited.
Set up menu is not for flying and is normally used before the flight to define the logger and task parameters. All pilot and glider data are defined in this menu as wel.
The View logger menu is for the flight analysis. All the flights being stored in the unit could be analyzed whitout data transfer to the PC (immediately after landing).
All four menus have sub menus . To enter to the sub menu use the vertical arrows. For detailed information see descriptions of menus.
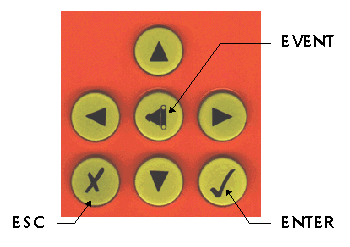
ENTER key always starts the edit procedure and is used as confirmation.
ESC key has two functions, go back and to accept the whole row in edit procedure. During the flight this key starts the wind calculation procedure.
The logger capacity doesnt mean the unused portion of useable memory ! It only shows the total memory depending on the settings of logging time. After the flight the number has not changed, but a new setting will change the number.
4. Turnpoint menu
Allows navigation to the selected turnpoint and edit the turnpoint data.
A new turnpoint can be selected by simply using vertical arrows. After a short press a new turnpoint which follows the old one alphabetically will be selected. For Apr. 1 second the turnpoint designation is shown in 8 chacter form to be sure about the name. This data base has a capacity up to 600 turnpoints. To make selection quicker there are special algorithms which allows jumps over more points. After the arrow is pressed continuously the jumps are bigger and bigger.
After ESC in this menu the wind calculation procedure is started and a message wait 2 is displayed.
This method based on ground speed changes during the circling affected with wind. To calculate the wind two circles are necessary (constant speed and no changing of position). After the procedure is finished the wind speed and direction are displayed.
After Enter the following screen will appear:
After using arrows four sub menus will follow.
TPOINT after ENTER data? N
After Y (arrow) and Enter the copy procedure will follow. The Colibri has its own airport database and the additional turnpoints can be copied from this database. Replace the four stars with ICAO airport code (up down arrows and Enter).
Confirm with Enter and a new turnpoint will be added to the TP database for further use. By unknown ICAO code press simple Escape select and select country.
Replace the four stars with the four first letters of the airport. By input of less letters confirm the rest of the stars with Escape. Now all airports with the same first letters will be shown (use Arrows to select).
Confirmation all four stars with Escape will show you all airports of the selected country (or State.)
Data
Input of a new turnpoint by input of the coordinates ( Copy APT confirmed with N)
Input of maximum 8 Characters. After input of all the characters the following message appears. The same procedure is used to enter the coordinates of the turnpoints. After all necessary inputs the following message will appear.
After Y this turnpoint is added to the TP database, by confirmation with N all data could be corrected again.
Select the TP under well known method (four letters) and change data.****
4.4 Edit Task
The Colbri logger has enough memory to store 100 preprogrammed Tasks. One of this Tasks could declared as an FAI Task (see setup logger). This task has no relation with navigation, navigation is possible only using Turning points. After Enter two different screens could appear.
TSK93 and for a preprogrammed task TSK01
NOT PROG 4pt 155km
That means Task 01 has 4 Turnpoints and the task distance is 155 km.
Programming a task using NOT PROG.
TSK 99 ENTER 0:NOTPRG ENTER
NOT PROG ------ -------km
TP NAME: select TP NAME: ENTER
**** AACHEN-D
0:AACHEN
---- ------km
Now the first turnpoint (point 0,start) is selected. For the next one press down arrow and repeat the procedure
After selection
The same procedure is used for all turnpoints and finish is the last one. The procedure is finished by pressing Escape. Tasks can be transferred to the Colibri via a PC and this procedure is much more comfortable.
4.5 Event function
This special key has two functions during the flight. Short press will activate the Event function which changes the sampling rate intervals (see Logger setup). After a longer press the following will appear on the display:
AP is actual position, that means the actual position is stored like a turnpoint as AP:19:43. The name could be changed using the edit function. 19:43 is the real time so having stored more AP the pilot is able to separate them simply by looking at the time. This feature can be used to mark themals.
Using the vertical arrows the following sub menus can be selected.
LOGGER TIME UNITS NMEA COM
SETUP ZONE SETUP OUTPUT SPEED
PASSWORD is not used during normal operation.
LOGGER SETUP
All important logger parameter are defined in this menu. After Enter the following settings could be altered.
NORMAL: after Enter the cursor is activated, which enables the sampling rate (interval settings)
12s
NEAR TP: logging interval near Turnpoint
2s
NEAR RAD: inside this radius Near TP logging interval is used
1.0km
PEV INT: this setting defines logging interval after event key was activated
2s
PEV FIX: number of fixes stored after event key is activated
30.
For example: PEV INT 2s, PEV FIX 30 setting
After event is activated 30 fixes each 2 seconds will be stored
K Record setting is not active.
COPY DELETE or EDIT
TASK TASK TASK
The Edit procedure is used to change the already declared task or set a completely new one, delete clears the declared task and copy makes a copy from TP menu ( 100 task in memory).
The FAI task has the following structure:
TAKE OFF
START
TURNING POINTS (0- 9 )
FINISH
LANDING
Example: declaration of a completely new task using EDIT TASK function.
After DECLARED TASK and Enter select EDIT TASK and press Enter.
T:NOTPRG after Enter SELECT and Enter TP NAME:
TAKE OFF TPOINT *****
Selection of turnpoint is done by replacing stars with letters or numbers. After the Take off is selected continue the procedure using INSERT to define the startpoint and the same way is used for all turnpoints. Landing is automatically set like Take off and the turnpoint before landing is finish (F). To change the landing for another Turnpoint use select. Using Arrows (vertical) the pilot is able to check his task before leaving the declaration
Important!
The procedure is finished after pressing ECAPE.
The COPY TASK procedure copies one task from the TP menu (see 4.4), the right task is selected using arrows. Using this method the take off and start are always the same points, the same for landing and finish. After the task is copied a normal edit procedure could be used to modify it.
All this data could be transferred via PC using Flight Info.
IMPORTANT: Using cylinder confirmation, the NEAR TP RADIUS defines cylinder where the acoustic signal will be activated to warn the pilot. After selected photo sector the acoustic signal will be activated exclusively inside photo sector.
GSP ground speed
TRM magnetic track
TRT true track
TEN total energy
WDI
WVE
All these settings are not obligatory but if used they will reduce the memory capacity.
PILOT:
GLIDER:
REG.NUM:
CMP.NUM:
CMP.CLS:
OBSERVER:
All this data could also be transferred using a PC.
VIEW
and press Enter. Now you are able to observe all flights stored in memory.
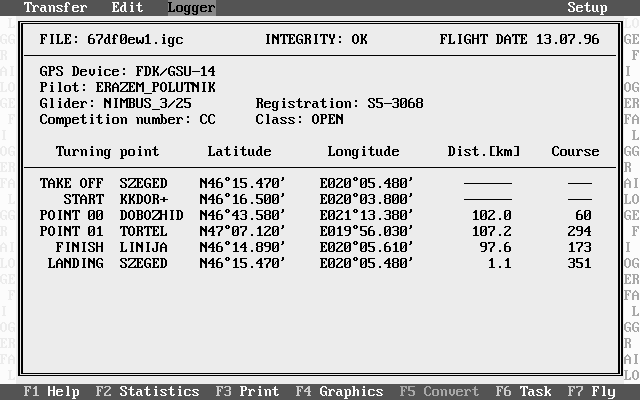
It is the second flight flown on 30.07.98
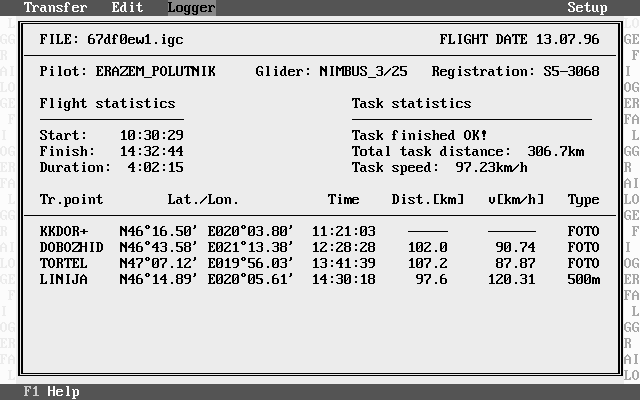
After Enter the task statistics calculation is started
The unit calculates selected task and needs some seconds to finish the job (depends on flight length)
Task distance
Task finished, task speed 88.1km/h
Vario average, percentage of climbing
Flown distance 580,6 km
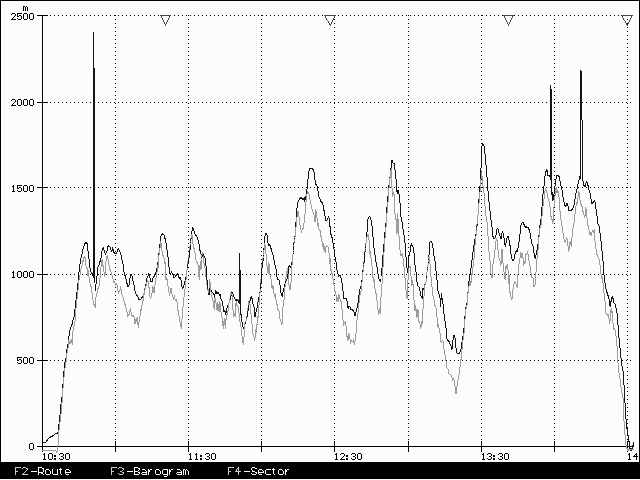
To start the leg statistics press the right arrow.
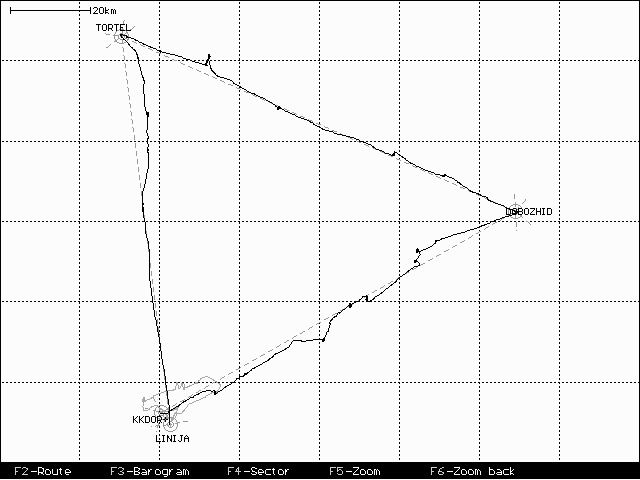
XC speed means the hypothetical speed between two turning points ower flown at the same altitude (not real altitude).
Using the right arrow the next legs can be evaluated.
7. Preflight briefing
The unit is ready as soon as the GPS OK message appears. For flight datalogging only, it is not nessary to declare a task. A non declared flight has only flight statistic. For all flights for badges and records it is obligatory to declare the task and setup the pilot information etc. before take off.
Some remarks:
-define cylinder,photo sector
-declare the task on the ground
-switch the Colibri on Apr. 5 minutes before take off (will not reduce the memory)
-after landing do not switch off the instrument immediately.
wait till message security check will appear, or
in GPS status menu.
8. PC communication
Using PC communication the following data can be transferred between the PC and Colibri.
-read logger
-TP and TSK data
-APT database (using LXGPS program)
-flight info (bidirectional)
For communication it is necessary to run the LXFAI program. A special cable is supplied with the unit which allows PC communication.
Procedure
Connect both (PC and Colibri) via the special cable and run the LXFAI program and press T.
PC Colibri
Read logger
Setup logger
Read flight info 19200 bps
Write flight info CONNECT
Read TP and TSK
Write TP and TSK
After pressing T the connect message will appear on the Colibri and all the commands are now sent from the PC. For instance after write flight info, the data about pilot and glider will be transferred from the PC into the Colibri. The Read command will transfer data from the Colibri into the PC.
9.0 Wiring
The Colibri is immediately on after power is applied to the connector (no on switch). Each unit is supplied with two cables:
-power supply cable (+red, GND black)
-PC cable with power supply and PC connector
Power supply cable extensions:
-output for LED for GPS monitoring
-NMEA output
Both modifications could be done by users.
-yellow /white GND
-black Rx
-red Tx ( NMEA)
-green LED Anode
-white LED Katode
-blue +12V
10.0 Appendix
Some examples of flight evaluation using LXFAI program.